Yellow Corners
After you have oriented your yellow edges, it is time. to orient the four yellow corners. This entire process can be done with 1 algorithm.
The first step in orienting the yellow corners is to determine how many edges you already have oriented. In this case, just like last time, a piece in the yellow layer will be considered oriented when yellow faces upwards. So, after edge orientation, you can have no corners oriented, 1 corner oriented, 2 corners oriented, or have all 4 corners oriented in rare cases. And, in each of those above cases, there are sub-cases, but they are all solved in the same way. Determine which case you have and follow the instructions below.
The first step in orienting the yellow corners is to determine how many edges you already have oriented. In this case, just like last time, a piece in the yellow layer will be considered oriented when yellow faces upwards. So, after edge orientation, you can have no corners oriented, 1 corner oriented, 2 corners oriented, or have all 4 corners oriented in rare cases. And, in each of those above cases, there are sub-cases, but they are all solved in the same way. Determine which case you have and follow the instructions below.
NO CORNERS ORIENTED
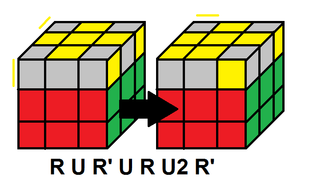
One of the cases you can have is that you won't have any corners oriented. To solve this, rotate the top layer until the yellow part of the bottom-left corner of the top side faces left. Then perform the following algorithm, called Sune. This algorithm is perhaps one of the algorithms you will use most when using this method.
R U R' U R U2 R'
After doing the algorithm, you should have oriented 1 corner.
Refer to the below picture for an example. Note that a yellow line outside of the cube denotes which way yellow faces on a corner.
When holding the cube similar to the case on the left, with a yellow part of a corner facing left, and performing Sune will orient 1 edge.
2 CORNERS ORIENTED
Occasionally, after finishing orienting your edges, you will have 2 yellow corners correctly oriented. Within this case, there are 3 sub cases that are dealt with in the same way.
So, again, you will find an unoriented yellow corner, and move the U layer to position it in the bottom left corner of the up face. However, with no corners oriented, you had the yellow of this corner facing left. When you have two corners oriented, you will have the yellow part of the corner facing forward. Then you will perform Sune. Again that algorithm is R U R' U R U2 R'.
Refer to the below pictures for examples.

|

Notice the yellow facing forward in the bottom-left position on the top face in each of these examples.
|

|
3 CORNERS ORIENTED
If you get to this step and see that you have 3 yellow corners oriented, then you have an impossible case for a regularly scrambled 3x3x3 cube. You may have 2 stickers switched somewhere, a corner may incorrectly turned, or something of the similar. If you have a speedcube or other cube with corners that easily twist, try to twist the unoriented corner to fix it. If that doesn't work, I would recommend disassembling your cube, and building it piece by piece into a solved position. While doing this, make sure that every corner and edge is able to be put into a solved cube, and that no two colors are switched on a piece.
If you get to this step and see that you have 3 yellow corners oriented, then you have an impossible case for a regularly scrambled 3x3x3 cube. You may have 2 stickers switched somewhere, a corner may incorrectly turned, or something of the similar. If you have a speedcube or other cube with corners that easily twist, try to twist the unoriented corner to fix it. If that doesn't work, I would recommend disassembling your cube, and building it piece by piece into a solved position. While doing this, make sure that every corner and edge is able to be put into a solved cube, and that no two colors are switched on a piece.
1 CORNER ORIENTED
When you get to this step where you have to orient corners and have only 1 corner oriented, it's rather easy. Notice that in all the above pictures, I have left the result of the Sune algorithm as a case where only 1 corner is oriented. This is because having 1 corner oriented is usually the last step in orienting the 4 yellow corners. There are 2 cases that can happen where only 1 corner is oriented, and they are very similar to each other.
In order to solve these cases, start by placing the oriented yellow corner in the bottom left position of the top face, be it by rotating your cube or the face. If you look to the corner in the bottom right position of the top face, the direction that yellow sticker points determines how many repetitions of Sune you will do to orient the rest of the corners.
If the yellow sticker points to the front, you will do 1 Sune. If it points to the right, you will do 2 Sunes.
If you have the yellow sticker in the bottom right position of the top face pointing to the right (this is called Antisune by the way), perform Sune, which is RUR'URU2R' to get to the other state of 1 corner oriented. Then do a U2 and you will see the yellow sticker in the bottom right now faces frontward.
If you have the yellow sticker in the bottom right position of the top face pointing to the front, perform Sune, which is RUR'URU2R' to finish orienting the yellow corners.
Refer to the below picture giving more instruction.
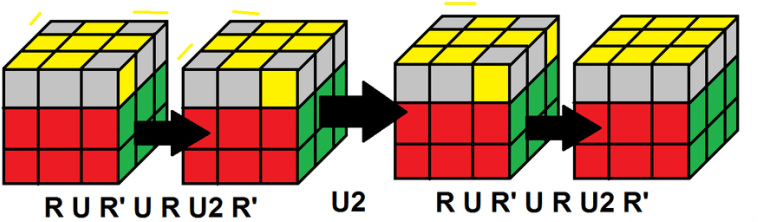
The farthest left image shows the yellow sticker in the bottom right position pointing to the right. Performing Sune and a U2 bring you to the other case of 1 corner oriented. Doing a Sune from there finishes orienting the yellow corners.
So after performing the correct Sune to any of the above cases of 0 or 2 yellow corners oriented will bring you to a case with 1 corner oriented where you can do Sune once or twice to finish orienting the yellow corners.
4 CORNERS ORIENTED
If you have all 4 corners oriented with yellow facing up after you finish with orienting the yellow edges, you are finished with this step and can move on to PLL, here known as Finishing Last Layer.
If you have all 4 corners oriented with yellow facing up after you finish with orienting the yellow edges, you are finished with this step and can move on to PLL, here known as Finishing Last Layer.
This page was last edited on May 30th, 2014.