White Cross
The first step in solving a cube is solving the white cross, and then finishing the white side. It doesn't have to be the white side done first, you can do any color that floats your boat, but I will start with the white side.
In essence, the cross that I am referring to is the 4 edges of the white side. And in order to solve this white cross, you must align and place all of these edges in the correct positions. To align the white cross means to have the white sides of the edges oriented the same way as the white center piece. And to have them in the correct positions is to have each edge oriented and lined up with the color on the edge that is not white.
Because that may be hard to understand, below is a picture of what a solved white cross looks like. Note that grey-colored cubies can represent any color.

To begin solving your white cross, begin by placing your white center facing the bottom. This entire bottom face will be known as the white side because of the white center piece.
Next, find an edge that has white on it. Now, bring that edge to the top layer (the yellow face) while keeping the white face as your bottom face. Determine the other color of your edge; that color should be either blue, red, orange, or green. Now rotate your cube so that the center piece matching the other color of your edge faces the front. Then rotate your top face until your edge that you are working with is matched up with its respective center piece. Then perform an F2 movement, so that the edge is between the white center and another center that matches with its other color. Repeat this process with the other edges being careful not to move an edge out of place.
I am positive that the above paragraph made no sense, so here is an example, using pictures and words.
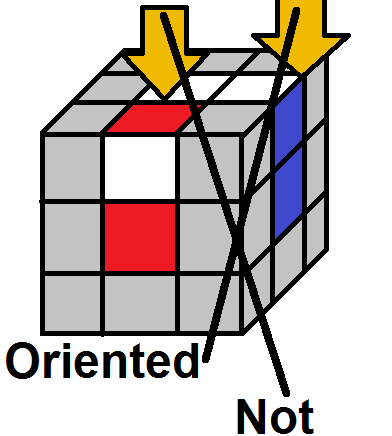
After you have done what the above has demonstrated, you have now correctly placed all of the edges. Now it is time to orient the edges. Some of the edges may already be oriented, some might not be. In our above pictures, the blue and green edges were correctly oriented; the red and orange edges were not. An edge is oriented if, when it's correctly placed, the two colors on it match with their respective edges. The green edge was oriented because the green part of the edge matched with the green center, and the white part of the edge matched with the white center. Below is an example of what an oriented and non-oriented edge would look like.
So, if your edge is oriented, you do not need to do the following. But for every non-oriented edge, you will have to do the following process. Make sure your white center piece is always facing down as the bottom face. This is where our first algorithm comes in. If you need a refresher on notation, check out my notation page.
Align a non-oriented edge as the bottom edge between its center and the white center piece. Then perform this algorithm:
F'(RUR')F2
So, repeat this algorithm for every edge needed, and you should have every edge oriented and placed. If done correctly, that means your white cross should be finished. Congratulations! You have finished the first step.
This page was last edited on November 23, 2013.